Seamless user authentication
Seamless user authentication lets a corporate partner create and authenticate iC Candle users on behalf of its own end users. Instead of asking every user to sign up inside the iC Candle embed, your backend exchanges an email address for a ready-to-use iC Candle session and receives tokens you can pass straight to the widgets and APIs.
If you are a platform authenticating users under a client / broker identifier (so they appear in the Organization Users embed at manage.iccandle.site), use Platform → Seamless auth (sub-org) (get-user-token-sub-org) instead of this page.
| Embedded sign-in | Seamless user authentication | |
|---|---|---|
| Who signs up | Each end user, inside the iframe | Your system, through the corporate API |
| Credentials | iC Candle account (Google, Apple, password) | Your corporate API key |
| Token source | auth.signIn postMessage from the embed | get-user-token API response |
| Plans | Purchased by the end user | Granted by you from the console or in bulk via API |
Prerequisites
| Requirement | Details |
|---|---|
| Corporate user | Issued to you by iC Candle (see step 1) |
| Corporate console access | https://corporate.iccandle.ai/ |
| API key | Generated in the console (see step 3) |
| Server-side caller | The API key and generated tokens must never be exposed in browser code |
Step 1 — Receive your corporate user
iC Candle generates a corporate user for your organization and sends you the credentials. There is no self-service signup for corporate accounts.
Step 2 — Sign in to the corporate console
Go to https://corporate.iccandle.ai/ and sign in with the corporate user you received in step 1.
The console is where you manage API keys, your bundle balance, and the plans granted to your users.
Step 3 — Generate an API key
Inside the console, generate an API key for the user authentication API service. This key authenticates your backend when it calls the endpoints below.
Open Create API key and choose which service the key will be used for.
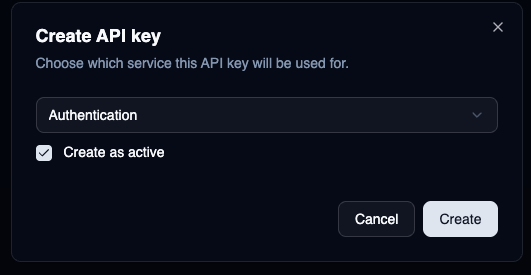
Leave Create as active checked so the key works as soon as it is issued, then select Create. Copy the key immediately and store it in your server-side secret store.
Keep the key server-side. Treat the API key like a password: call the authentication API only from your server, never from a browser, mobile app, or any client you ship to end users.
Step 4 — Get user token
This endpoint accepts up to 100,000 requests per minute.
Each user is also subject to a 1-hour cooldown: once a token has been issued for an email, the next token for that same email can only be generated an hour later.
You can cache what you receive and reuse it for the lifetime reported by expiresIn — calling this endpoint on every request from your app is not ideal.
POST https://api.iccandle.ai/seamless-auth/get-user-token
x-api-key: <your-api-key>
Content-Type: application/json
Request body:
{
  "email": "test@email.com"
}
Response:
{
  "email": "test@email.com",
  "created": true,
  "idToken": "",
  "accessToken": "",
  "refreshToken": "",
  "expiresIn": 86400,
  "tokenType": "Bearer"
}
TypeScript type:
type UserTokenResponse = {
  email: string;
  created: boolean;
  idToken?: string;
  accessToken?: string;
  refreshToken?: string;
  expiresIn: number;
  tokenType: "Bearer";
};
| Field | Type | Description |
|---|---|---|
email | string | The email the session belongs to |
created | boolean | true when the request created a new iC Candle user for this email |
idToken | string | Identity token for the user |
accessToken | string | Token used to invoke iC Candle APIs |
refreshToken | string | Token used to obtain a new session when the current one expires |
expiresIn | number | Session lifetime in seconds (86400 = 24 hours) |
tokenType | string | Always Bearer |
Example call:
curl -X POST \
  https://api.iccandle.ai/seamless-auth/get-user-token \
  -H "x-api-key: $ICCANDLE_API_KEY" \
  -H "Content-Type: application/json" \
  -d '{"email": "test@email.com"}'
Step 5 — Sign the user into the widget
After you have tokens from get-user-token, load the embed on /{locale}/sign-in with those tokens as query params. The embed creates a session from them — the end user does not go through Google, Apple, or a password form.
Call POST https://api.iccandle.ai/seamless-auth/get-user-token from your backend. Pass the returned tokens to the host page, then set the iframe src. Do not put the API key in browser code.
Skip the request when a session already exists. Use useICCandleAuth() — if isAuthenticated is true, reuse the session. That avoids the 1-hour per-email cooldown from step 4.
- Check auth with
useICCandleAuth(). IfisAuthenticatedistrue, leave the iframe on/{locale}?theme=…&header=…and do not call the API. - Generate a token only when
isAuthenticatedisfalse. Your backend posts the end user's email toget-user-token. - Confirm
idToken,accessToken, andrefreshTokenare all present. - Set the iframe to
/{locale}/sign-inwith those tokens mapped to query params.
Always check auth before you generate a token. If isAuthenticated is already true, reuse the session and keep the iframe on /{locale}. Calling get-user-token for an email that still has a live token is unnecessary and can hit the 1-hour cooldown from step 4.
Widget implementations:
Call POST https://api.iccandle.ai/seamless-auth/get-user-token from your backend with the corporate API key. Do not put that key in the host page.
| Query param | API response field | Required |
|---|---|---|
id_token | idToken | Yes |
access_token | accessToken | Yes |
refresh_token_param | refreshToken | Yes |
theme | light, dark, or system | No |
header | true to show the embed header, false to hide it | No |
The refresh token must be sent as refresh_token_param, not refresh_token.
Call get-user-token again for the same email to obtain a fresh session before expiresIn elapses. Because of the 1-hour cooldown, request the new token well ahead of expiry rather than at the moment the old one runs out.
Step 6 — Manage plans and balance in the console
From https://corporate.iccandle.ai/ you can:
- Grant a plan to a user.
- Top up your bundle balance.
- See your remaining balance.
- Review your transaction history.
Step 7 — Bulk grant plans
To grant a credit plan to many users at once, use the bulk endpoint instead of the console.
POST https://api.iccandle.ai/corporate-client/v1/bundle/plan/bulk
x-api-key: <your-api-key>
Content-Type: application/json
Request body:
{
  "emails": ["test1@email.com", "test2@email.com"],
  "plan": "pro"
}
| Field | Type | Description |
|---|---|---|
emails | string[] | Emails of the users receiving the plan |
plan | string | Plan to grant, for example pro |
Granting plans draws down your bundle balance, so top up in the console before a large bulk grant.
Typical flow
- iC Candle issues your corporate user.
- You sign in to the corporate console and generate an API key.
- You check auth with
useICCandleAuth()from the React or Vue widget. IfisAuthenticatedistrue, skip the next two steps. - Otherwise your backend calls
get-user-tokenwith the end user's email. - You load
/{locale}/sign-inwithid_token,access_token, andrefresh_token_param, or useaccessTokenas a Bearer token for iC Candle API calls. - You grant the user a plan from the console, or in bulk through the plan API.